Disclaimer for Tutorials: I use Photoshop CS 8 for Mac so I can't speak to how things may work in a different program. However, I've posted this tutorial in the forum & if you have any other general tips or tips for different programs, please post them in the thread!
Last week I covered how to use templates & this week I'm going to talk a little bit about drop shadows. If you're a newbie to digital scrapbooking you might be wondering what drop shadows are; if you're an old hand you know they can sometimes be frustrating to get just right & there are million & one different ways to use them.
That being said, if you're a newbie know that drop shadows are really great but there is really no right way to do them. A search for drop shadow tutorials on Google will yield tons *2,240,000 to be precise* of all the different methods. Drop shadows are very personalized depending on your visual tastes but there are a few general rules that will help.
First, drop shadows really are essential to make your layout complete & looking more realistic. Let's face it, we work in a digital medium & when you print out your pages without drop shadows they will look flat. But adding drop shadows will make things pop & give your layout that extra wow factor.
On left is one of my layouts that doesn't have any drop shadows. It's cute but seems a little blah. Plus I have a little date stamp on the right next to the bottom picture & you can't see it all. But on the right is my layout with drop shadows; they're subtle which is my preferred style, but they give the layout depth & allow elements & papers that are similar colored stand out from each other. Now you can see my date stamp & my paper strips stand out much more. *Psst ... I used Dress Up Time by B2N2 Scraps & Gettin' Scrappy with Britt for this layout*
Second, you really should use a drop shadow on every layer on your layout. It may work to shadow each layer individually or in the case of a cluster, merge it all together & then shadow. Again, it's down to personal preference but you'll find that it really makes a difference. My personal preference is also to use a very light drop shadow on text layers but that's just me 'cause I like how it looks.
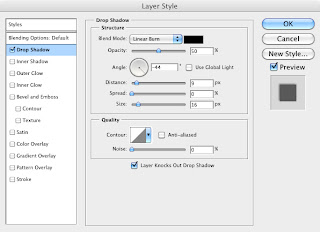
Third, make sure your light source is consistent; for all my drop shadows, I have Angle set at -44. Don't ask me why I use that angle, I think it was a setting I picked up from somewhere & really liked the look of. Now if I make a new drop shadow style, I make sure that my angle is set to -44 so that it's consistent with all my other styles. Here's what the settings for my paper layer style looks like.

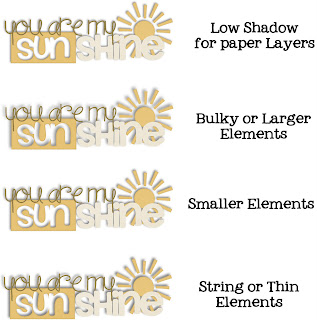
Again, there is no right way to do this so play around with Distance, Spread & Size until you've gotten the results that you are looking for. In general, smaller elements usually need smaller, lighter shadows while paper layers need larger darker shadows. If your layout is very dark, you'll need darker & larger shadows, a lighter layout will need lighter & smaller shadows. You might use a paper drop shadow on an element or vice versa, just mess around until you've got something that looks good. Here's some good examples of what different shadows can look like on elements. *Psst ... go to This Little Missy's blog to pick up this cute word art freebie!*

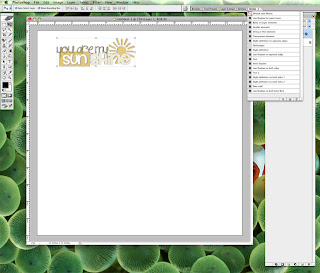
I have all my favorite drop shadows saved in my Style Palette, that way I can quickly try out different shadows to see what works best. The top set of shadows is one I downloaded & then after I messed around with things, I saved a few of my own creations. When you've gotten a shadow to your liking & want to save it, make sure the layer is highlighted & then click on the Create New Style button in the Style Palette which is the one that looks like a piece of paper. Make sure that Include Layer Effects is selected, if you've made changes to the Blending Options, that will need to be selected as well. Give it a name & save!

There are a lot of free layer styles out there to snag if you're a newbie, do a search on Google for free drop shadow layer styles & you'll get a bunch of hits. Try them out to see what you like & then create some of your own. If you've got more questions about drop shadows, post them in the Tips, Techniques & Questions sub-forum & one of our fab forum members will give you a hand.
A special thanks to Megan Turnidge for the drop shadow examples!


No comments:
Post a Comment