
You will need to start with a shape/element, etc that you want to turn "glittery". You may have one already, but for the sake of this tutorial, lets create one.
Step 1:
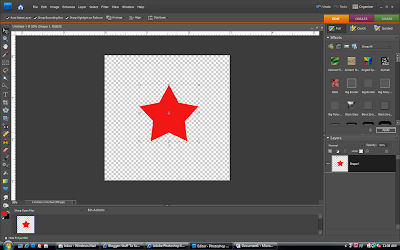
Open a new document (Ctrl N in PSE)...make it about 3 inches by 3 inches, 300 dpi, RGB color mode and a transparent background.
Step 2: Now, lets create a shape. You can do this by using your Custom Shape Tool
It looks like this:

Select a shape. For this tutorial, lets use the star shape. Click on the Color Box (just below your top menu bar) and change the color to red. Drag out your shape and then click the Simplify button (up at the top...just to the right of the color box). It's very important that you simplify your layer...otherwise your next steps won't work!
 Step 3: Duplicate your layers. Right click on the star in your layers palette and select Duplicate. Do this two times (so that you have a total of 3 layers of stars)
Name the bottom layer Star the middle layer Overlay and the top layer Screen.
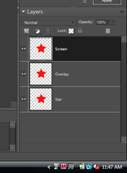 Next you will need to change the Layer Mode of each layer to match their name. To do this, click on the arrow next to the word "Norma" just above your layers. So, change the overlay layer to Overlay and the screen to Screen. Leave the Star layer as Normal.
Step 4: Now you are going to "add noise"! Up on your main menu, click on Filter then choose Noise> Add Noise 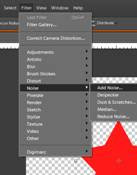
On the Star layer, set the amount to 30, Distribution to Uniform and check the box that says Monochromatic.
On the Star layer, set the amount to 30, Distribution to Uniform and check the box that says Monochromatic.
On the Overlay and Screen layers, set the amount to 40 and Distribution to Gaussian, and check the Monochromatic box. 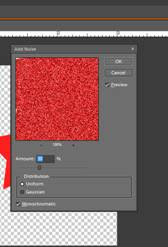 Step 5: Duplicate your Overlay layer and drag it to the top of your layer palette. On the top menu go to Filter > Render> Difference Clouds.
Step 5: Duplicate your Overlay layer and drag it to the top of your layer palette. On the top menu go to Filter > Render> Difference Clouds.Whoo-hoo...you're almost done! Now you are just going to "personalize" it a little bit by adding drop shadows.
On your Star layer, add a low drop shadow. Click apply. Once you do this, you can double click on the fx that is now showing in your star layer. Here, you can play around with your shadow sizes. I like to change my size to about 24, my distance to 10 and my opacity to 28. Here, I also add an inner glow and a slight bevel. But, like I said, here is where you personalize it and make it yours! So, play around and see what you like!
Ok...last step. Merge your layers (Ctrl E) and save (Ctrl S). You're all done! Yay!!! You have just created your first glittery element!!!!
You can do this with elements and shapes that you already have...or you can create shapes like we did here!
Have fun!!!

6 comments:
Thanks so much for doing a PSE tutorial!
Thanks - this was really cool!
Haven't tried it yet, but saved it so I can try it later. Love tutorials! Thank you!!
This is unrelated to your post, sorry about that but I don't know where to find this information. I've asked on Yahoo Answers and looked at the Help section on Blogspot as well.
It's a square image & very small 160x160 pixels. No matter if I use the Blogger picture uploader or link to it from Tinypic.com, my picture gets blurry and squished. Can someone please help me? I know some HTML so if you could give me a code or tell me how to do it, please, I'd appreciate it so much =)
Thank you!
This was a great tutorial - I was able to follow it easily. Thanks so much for sharing!
Definitely thank you! It is awesome!
Post a Comment