Before we start, did you know you can follow the blog to make getting updates easier? Look to the left & under Follow The Blog you can add us to your Google, Netvibes, Newsgator, or My Yahoo feed reader. Personally, I follow a ton of blogs & find this the best way to keep up with them all & not miss anything important *like freebies!* so add us to your reader to stay on top of all the Stuff to Scrap news. Plus you can also sign up for our weekly emails by clicking on the STS Email button, you never know what may drop into your inbox!
Down to business; this wonderful tutorial comes from Britt of Gettin' Scrappy with Britt but I've done a little tweaking, hope you don't mind Britt! Click on any of the images in the post to see them at full size.
To post your layouts in the forum to participate in the challenges, you'll need a personal gallery. Once you've registered in the forum there is no need to register for the gallery; just click on the Gallery tab at the top of the forum.
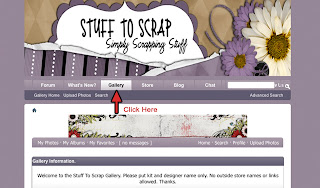
Once in the gallery, you have the option to make different albums for your layouts if you want; I highly recommend this as it will help you find your uploaded layouts easier. A good option is to have at least two albums, one for non-challenge layouts & one for challenge layouts. Of course you don't have to make an album but it does help keep things organized. To make an album, click on My Albums at the top of the page. Then click on Create a New Album, give it a name, & you're done.
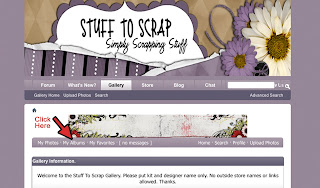 Now you're ready to upload some layouts; click on Upload Photos.
 Now you can choose to upload to one of Stuff To Scrap galleries or one of your albums. I would recommend uploading to one of your albums or the Member Galleries. This way everything is under your user name & when you click on My Photos you will be able to see all of your layouts.
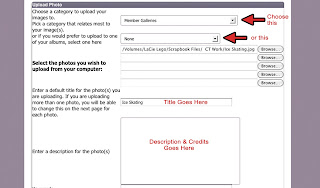
You can upload 5 images at a time, but we ask that you upload a maximum of 10 layouts per day. Images must 600 pixels x 600 pixels or 2 inches x 2 inches; please keep the size of the layout under 300 KB. Click on Browse to find your layout on your computer. Then enter a Title for your layout; if you are uploading more than one layout, you can leave this area blank. If you like you can enter a description in the box below the title but I would recommend waiting until the next step, you'll see why in a moment. Click on Upload/Submit at the bottom of the page.
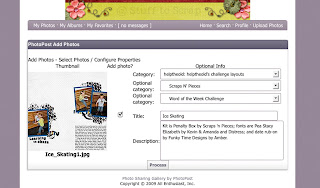
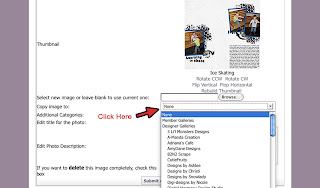
This next window is where you can enter in titles if you've uploaded multiple layouts & choose additional categories to add your layout to. If you're using the kit of a Stuff To Scrap designer, you'll find their gallery in the drop down menu, same for the challenge galleries. If you are making a layout that is not for a challenge, we do have a Non-Challenge Layout gallery to copy your layout into.
It is a Stuff To Scrap policy that you give credit where credit is due, please include the kit & designer name, template designer, etc. in the description area. You may link to a kit by a Stuff to Scrap designer but no other links are allowed.
The reason I advocate putting the descriptions on this page is that if you put a link or the symbol "&" in the previous page, the forum host thinks it's an HTML code & messes up your link or text by translating the "&" into code. If you would like to put a link in the description, this is the page to do it on; you can either paste the link in the description box or use HTML code.
You'll need to use brackets ( [ ] ) to make the HTML code work. When I link a kit to the Stuff to Scrap store I use the following code: [url=LINK][b]KIT NAME[/b][/url] This links up the text & turns it bold so your viewers know it's a link. You can also change the text color but I don't know the code to do that, if anyone does let me know & I'll add it.
Click on Process & your layout is uploaded!
 If your layout happens to be made using kits from two Stuff to Scrap designers AND is for a challenge, you can add it another category. Once your layout is uploaded, click on My Photos, then on your image; you should now see a Photo Options link in the top right corner, click on that, then on Edit Photo.
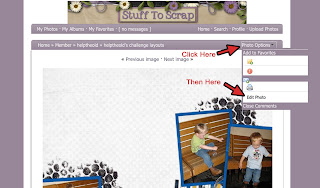 There is an option to Copy Image To & you will be able to choose another category to copy your image to. You can make changes to your description here but if you've copied your layout to another category, the changes will not transfer to the already chosen category. You'll need to go to each category to do that. Hidden under the drop down menu on the example is a link to the other categories, click on there to head straight to the edit window for the category; a good shortcut to know about.
You can also upload a new thumbnail image; if you decide to change the thumbnail, you'll need to give the image a different name so the system recognizes that it's a new thumbnail. Remember to hit Submit to save your changes.
I think that's about it for the Gallery, if I've missed anything please let me know & I'll update the post. Come back next week for our next tutorial!
No comments:
Post a Comment