
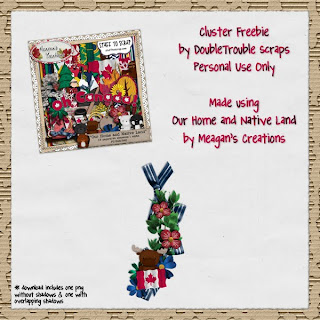
Here's what it will look like at the end, on the left is my cluster without any shadows & on the right there are overlapping shadows. The best way to see it is to look closely at the moose & flag [isn't that moose adorable?!?]. On the left you can see there is no shadow but on the right the shadow is there but is not extending into the white space.

Let's get started by making a cluster; I'm going to be using a white background so you can see things clearly but if you're making this as a freebie you'll want to eventually end up with a transparent background. I'm also going to use a very, very dark shadow for clarity but in the finished example the shadows will not be that dark.

Once your cluster is done too your liking, turn off all the layers except the bottom two layers. Again, the white is just there for contrast.

Copy the top layer [Layer 3]. Leave the copy [Layer 3 copy] unshadowed & then add a shadow to the original top layer [Layer 3].

Use Ctrl + G to clip your shadowed layer [Layer 3] to the layer beneath it [Layer 7]. On the zoomed view, you'll see that the shadows that were all around the greenery are now just on the portion of the greenery that is overlapping the ribbon.


Finally, link & merge all three visible layers together [Layer 3 copy, Layer 3, Layer 7] & you've got the overlapping shadows for greenery done!

To do the rest of the layers just follow the steps above, if your cluster has a lot of layers then it really helps to only have the two layers that you are working on visible.

Once you've got all your shadows done & layers merged you should end up with your final cluster that has overlapping shadows!

If you have a lot of layers in your cluster this could take a while but I know everyone using the freebie will love having the overlapping shadows & still be able to add their own shadows. Next week I'll cover how to finish your cluster off for people to snag.
A very special thanks to Meagan of Meagan's Creations for showing me how to do this. Even better she let me use her newest kit, Our Home and Native Land for the example & is letting me give away a little freebie as well! Click on the preview to go to 4shared [or click HERE to download from Mediafire] & download my cluster, I've included both the unshadowed & shadowed versions for y'all!
** This freebie has expired, check back often for new freebies! **
Disclaimer for Tutorials: I use Photoshop CS 8 for Mac so I can't speak to how things may work in a different program. However, I've posted this tutorial in the forum & if you have any other general tips or tips for different programs, please post them in the thread for everyone to see!
No comments:
Post a Comment