
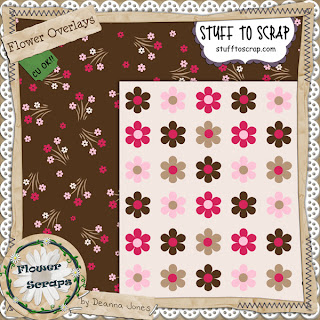
OK, to make a patterned paper you need to start with a pattern file, typically the patterns you will find for sale or for free are layered TIF or PSD files. This makes it very easy to recolor the parts of the pattern to your liking. Let's use this cute flower pattern by Deanna of Flower Scraps; as you can see in the layer palette, there is a separate layer for each color in the file.

To change the color of each layer, you'll need to go to Layer -- > New Fill Layer -- > Solid Color. Name the layer if you like & then when the Color Picker option pops up, choose your color using one of the options provided. Clip your new color layer using Ctrl + G to whichever layer you choose.


Now repeat the above steps until you've got each of the provided layers whatever color you desire. Like last week, you'll notice your paper looks a little blah so open up a texture, place it at the very top of the layer palette, & change the layer from Normal to Overlay. Now you've got a cute little paper that's almost finished.


To finish off your paper, go to Layer -- > Merge Visible & the layers will all merge together. Make sure you save your paper at the highest resolution & 300 ppi for the best results.

But what do you do if you don't have a layered TIF or PSD file & just a JPG to work with? All you need to do is use your Magic Wand tool to select each color in the file & create a layer. Make sure that the Contiguous box is not checked as you want to select all of the same color in the file. After selecting the color, right click & select the Layer via Copy option, this way the original layer stays intact. When you turn off the original layer, you'll see how you've now got a brown layer.


Continue to do the above steps for each color, for anything other than the background you'll need to play around with the Tolerance so that you don't have any white space peeking through. As you can see in the example on the left, I used a tolerance of 50 but when I zoomed in, there was white space showing around the flowers. I upped the tolerance to 125 & now you can see there is no white space around the flowers. This is something that you have to play with each time to get the best results.


Once you've got all your new layers made, use the previous steps to change the color & add texture. Note that this will only work if you have a patterned overly that only has solid colors, if the pattern has a texture on it, it will be much more difficult to make different colored layers. You can still use the Magic Want tool on a pattern that has texture but it won't be as exact as one with solid colors.
I promised a goodie & I won't disappoint, the lovely Deanna has let me offer the two patterns I used in my examples as a freebie to you all. Click on the preview for the direct download & go check out Deanna's store for more great pattern overlays!
** This freebie has expired, check back often for new freebies! **
Disclaimer for Tutorials: I use Photoshop CS 8 for Mac so I can't speak to how things may work in a different program. However, I've posted this tutorial in the forum & if you have any other general tips or tips for different programs, please post them in the thread for everyone to see!
No comments:
Post a Comment